Monday, May 21, 2012

And More Scrapbook Trees!

I am having so much fun creating these scrapbook trees!  I decided to make a few more for our mom's for Mother's Day (we celebrated with them a week later). 

Following the same steps used with the first tree, the second and third went much quicker!  Each one is so unique compared to the others - and I definitely like more paper leaves as opposed to less.

For the second tree I selected a variation of blue scrapbook paper with a beach theme - turned out pretty cute!

For the next one I selected a variation of burgendy, green and neutral tones - turned out pretty as well!!  My mother-in-law's kitchen is done in grapes and wine; so this will fit nicely with her color scheme.  :)

I love how each arrangement looks totally different from the last.  This project will probably show up on my "to do list" several times throughout the summer.  I'm thinking these will be super cute with autumn and Christmas paper and perfect for our craft show!

Have you tried making one of these fun scrapbook paper trees?  I would love to see your designs!!

Happy Crafting!

Monday, May 14, 2012

Scrapbook Paper Tree

I hope everyone had a wonderful Mother's Day weekend!  We spent a lovely day at the zoo and then I got some crafting done in the afternoon while the little one's slept!

The first craft I accomplished this month is the scrapbook paper tree I found on Pinterest; thanks to http://www.everydaymomideas.com/.  What a fun project this turned out to be!!  I'm happy I went out of order of my crafting goals and started with the one project that was going to be extra for the month!!

Materials Needed:
Scrapbook Paper
Scissors
Floral Wire
Side Cuts / Wire Cutters
Elmers Glue
Branches from good ole Mother Nature!
Vase

Overall Time:  Approximately 3 hours from start to finish

I followed the tutorial on Everyday Mom Ideas and began by creating a template out of cardboard - making two different sizes. Using the leaf template, I traced the leaf onto various sheets of scrapbook paper and cut them out.


Once I had a good number of leaves, I glued them together with a piece of flora wire sandwiched in between.  This created a "vein" down the center of the leaf.


Let the fun part begin!!  I found it was easier to wire the branches together so they sat properly in the vase.  Overall there are around 50 scrapbook leaves on the branches and I love how it looks!

I'm already working on the second one and I will probably use more leaves to see which variation I prefer.  This project will be great for seasonal decorating - especially in the fall, I can see it already with gorgeous autumn colors.  :)


Happy Crafting!


Wednesday, May 9, 2012

Finding Art Ministry - Diego Rivera

In honor of Cinco de Mayo (yes, I know it was a few days ago, lol!) I decided to do a post on Diego Rivera.  He was born in Guanajuato in December 1886 to a affulent family; his father's side was of noble descent.  At the tender age of ten, Rivera began studying art at the Academy of San Carlos, in Mexico City.  In the year 1907, he traveled to Eurpoe to continue his art education in Spain and France.  Like many other artists studying in Europe, he became influenced by Cubism and the works of Picasso at the time.  By the 1920's he shifted his interest to Post-Impressionism and his work took on more interest and started selling in galleries. 

Diego Rivera returned to Mexico in 1921 and was commissioned by the government to paint murals on public buildings.  His murals refelcted Mexican society and the 1910 revolution; he strived to create art that reflected the working class and native people of Mexico. Throughout time, Rivera's style developed into an Aztec influence with bright bold colors and large simplifed figures. 


From the cycle Political Vision of the Mexican People Tehuana Women. Fresco 1923

In the early 1930s, Rivera became on of the most sought-after artist in the United States. He received several commissions for paintings as well as commissions for three murals in San Francisco and was given a one-person exhibition at the Museum of Modern Art. In addition, he decorated the central court of Detroit Institute of Arts; was invited by General Motors to create murals at the Chicago World's Fair; and he painted murals at Rockefeller Center and the New Workers School in New York.

With all this success, his artwork was also met with controversy.  Rivera's mural at Rockefeller Center included a portrait of Lenin and he was asked to remove it.  When he refused, the mural was destroyed - which is now viewed as one of the greatest scandals of art history. 

Flower Seller 1942 by Diego Rivera
Flower Seller, 1942

Dream of a Sunday Afternoon in Alameda Park, 1948 Fresco
Flower Vendor by Diego Rivera
Flower Vendor, 1935

Friday, May 4, 2012

May Crafting Goals

Unlike last month, I plan to get started on May crafts before the month is over!!  This is, however, going to be a busy month with birthdays, vacation and a holiday - so I guess we will let life dictate how successful this month will be.  :)

Crafting Goal Numero Uno - the silk flower collage painting I wanted to get done last month. 

Number Two - this super cute hand print art I found via Pinterest:
soo cutehttp://back40life.3dcartstores.com/The-best-things-in-life-8x10_p_155.html

This one would make excellent Mother's Day gifts for the grandma's!!! 

Project Number Three (if time allows, lol!) - I have been wanting to do this one for months.  Another awesome idea from Pinterest. Scrapbook paper leaves on branches - brilliant!


Pinned Image

What are your crafting goals for this month?

Happy Crafting!

Thursday, May 3, 2012

Glue Art

This was my last craft I got done in April, I apologize for the late post!  I was originally going to do a silk flower collage painting, but ran out of time last month.  So - I decided to try my version of a project I saw on Pinterest. 

Super easy project to do with children, it just took some time and patience waiting for the glue to dry. Perfect rainy day art project!!

Materials Needed:
Canvas Board
Glue (such as Elmer's glue)
Paint (I used Acrylic paint)
Paint Brush
I started just by creating a design on the canvas board with the glue.  My glue seemed really thin (it's been in the basement for years!), so next time I try this project I will buy new glue and see if it makes a difference. 

After letting my glue design dry, I decided to paint over it with acrylic paint and see what kind of effect it would have. 


I almost like how the design looked before I painted the canvas.  I will definitely try this one again and see how water colors work over the glue design. 
Happy Crafting!

Sunday, April 29, 2012

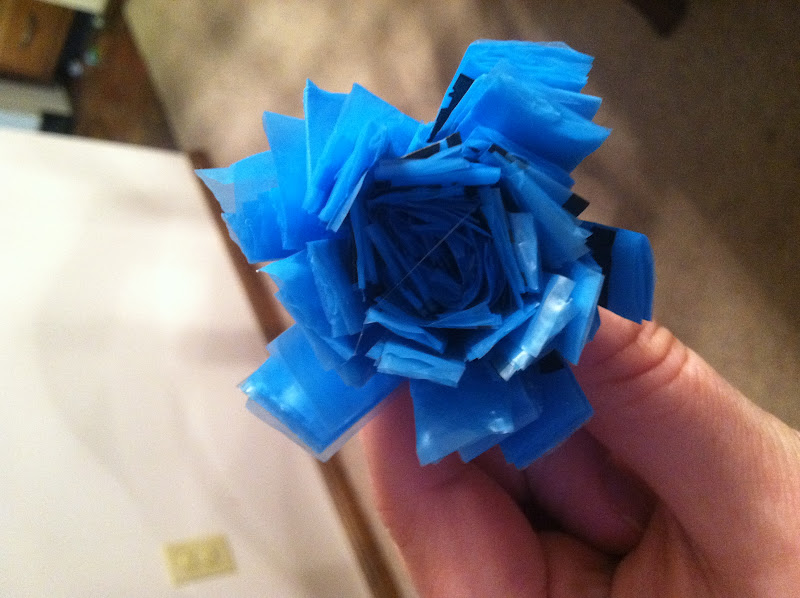
Upcycled Hair Bows!

Do you ever find yourself wondering "What should I do with all these plastic grocery bags?".  The answer, of course, is: Make Hair Bows!!! 

I am so glad I found this craft at http://www.freekidscrafts.com/plastic_bag_hair_rosettes-e418.html.  Over the years I have collected umpteen plastic bags and I hate to throw them out.  This craft is the perfect solution.

Materials Needed:
Plastic Bags
Scissors
Hot Glue Gun
Buttons
Hair Barrette


The first bow took me around 15 minutes, but after I got the hang of it the next few only took about 10 minutes.  Freekidscrafts.com has a wonder step-by-step tuturioal for these bows. Another use for plastic rosettes could be budget-friendly party decorations! 


Love how it turned out!  Have you made these or have a clever way of upcycling plastic bags?  I would love to see your ideas!!

Happy Crafting! 

Join me over at Coastal Charm! 


Wednesday, April 25, 2012

April Weddings - Simply Happy!


First thing that comes to mind when I think about April weddings is daisy's and the color yellow!  I'm not entirely certain why I always associate these two with spring - could be because both the color yellow and daisy's are very happy looking.  The perfect combination for a spring wedding - thus making our theme this month Simply Happy!!

In the language of flowers, daisy's represent purity, innocence and a new beginning. This flower is just screaming wedding and marriage!  The age old saying "fresh as a daisy" can be seen as a bride's desire to express the youthful and joyful side of love. 

When selecting the daisy as the main flower, the rest of the wedding attire and decor should remain simple to carry the symbolism throughout. Definitely follow the saying "less is more"!  These lovely flowers are also very friendly on the budget and have been called the "new rose".  A wedding flower budget can be stretched much further by selecting daisy's and gerbera daisy's rather than roses and lily's - and the end result can be just as breath-taking!

Daisy's are also quite versatile and can be designed to be modern or old fashioned.  While I was shopping for flowers to make this month's bouquet, I came across a beautiful assortment of silk daisy's and spring flowers at JoAnn's.  I wasn't certain how I exactly wanted the bouquet to look, so I let the flowers do the talking and let it take shape.  If I had thought of these colors 10 years ago - I definitely would have made this my wedding theme!!


When choosing bridesmaid dresses, I found the perfect solution at Catan Fashions! Both of these dresses would look fabulous with daisy's, especially the color combination. Simple, happy and elegant at the same time.  :)


Enjoy your day and happy crafting!!